Tuesday, June 22, 2010

Here's a wonderful Christmas craft--paper ornaments!

This is another simple, easy Christmas ornament that can be made quickly.  If you have the paper strips already pre-cut, this would even be a fun project for the entire family with smaller children.  For older children, cutting the strips could be a fun part of this project.  Picture these festive ornaments hanging all over your living area.  How fun!

_______________________________________________________________________________
 
 
diy wednesdays: modern paper ornaments
beauty.jpg
it’s official. we drove by a real-life christmas tree lot today, which means that it’s time to get cracking on our holiday decorating. these paper ornaments can be hung just about anywhere (from a tree, in a window, from a chandelier) and they are super simple to make. all it takes is some paper and a stapler to make any room feel festive. just click here for more photos and full instructions.
happy decorating!
-derek & lauren
process.jpg

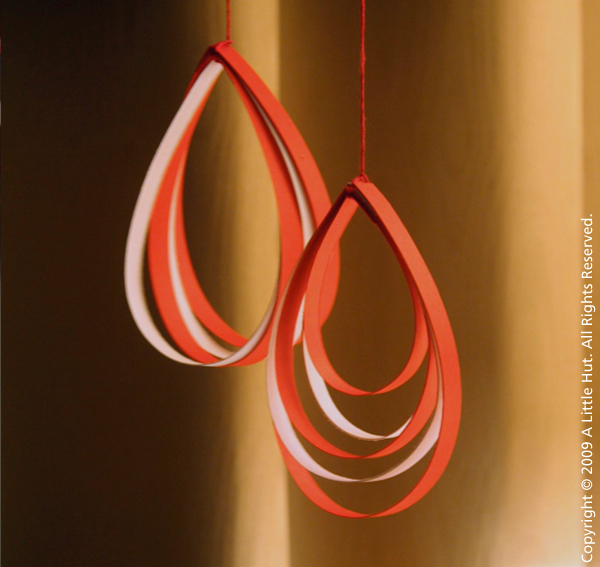
Here’s what you’ll need:
-Various colors of paper or cardstock, cut into 1″ x 11″ strips. We used 5 colors of cardstock plus silver and gold gift wrap.
-X-acto blade
-Metal ruler
-Cutting Mat
-Stapler
-Thread or monofilament for hanging
Using your X-acto blade and straight edge, cut a few sheets of each color paper into strips that measure 1″ wide by 11″ long.
Lay out your color combinations. We used 3 colors per ornament, repeating the middle color on the outside of each one.
Cut the center strip down to 6″ long. The following concentric layers will consist of 2 pieces, each measuring 7″, 9″ and 11″, respectively.
Make sure the tops of all the strips are flush, and then staple them together. Then line up the bottom edges on the opposite side, so that they are flush, and place a staple on that end. We kept it nice and simple, but there are a bunch of different configurations you can do by playing around with the lengths of the strips and different placement of staples. Now just find a favorite spot to hang them. Ours are clustered above the dining room table.
jump.jpg
Blog Widget by LinkWithin

Read more at Design*Sponge http://www.designspongeonline.com/2007/11/diy-wednesdays-modern-paper-ornaments.html#ixzz0rcuY7pKK

Tuesday, June 8, 2010

Are you ready for the Holidays? They will be here very soon!

I hate when the Christmas holidays arrive and I am not ready.  I don't enjoy the holiday; I don't feel festive.  All I really feel is angry and frustrated.  Especially since I hate shopping, the crowds make me crazy.  So this year, I have a plan that I thought I would share with you.

On June 25th, there will be exactly 6 months until Christmas.  So I am making a shopping list--presents, decorations, food, etc. that goes with Christmas.  I will split my list into two week sections, so every pay period I will get something to prepare myself this year.  If I start now, I may just be ready for the season and be a little less grouchy to boot!

My list so far goes something like this:

List of family to buy for
List of friends/co-workers to buy for
Decorations still needed or to be replaced
Craft items needed
Holiday cooking menu and grocery list

These lists, in turn, will be broken down by pay periods and then I can plan to spend a little each check to get what I want to get for Christmas this year--all while avoiding the crush and rush of that season's shopping.

I hope this inspires you to try this or come up with your own way to get ready so you, too, can have a festive holiday this year.
Reblog this post [with Zemanta]

Monday, June 7, 2010

Here's another easy decoration you can make--

When I found this picture I was taken by the simplicity.  If you made several of these and hung them on your tree, it would make a wonderful statement.  Think about it, if you had your children make you some drawings and then you either sized them down or cut them into small squares and used them for the squares.  The ones in the picture are made out of cloth and you can find the tutorial here.

I think I will adapt this to use heavy cardstock and ribbon, maybe with some glitter and dimensional paint thrown in.  If you try this won't you let me see your finished product?  I know I'd love to see it.

Friday, June 4, 2010

Origami wreath tutorial

A little paper ornament - simple to make, perfect for popping inside a Christmas Card. Want to have a go? I promised a tutorial, so here's what to do.
Music wreath
You'll need to begin with a rectangle of paper 4cm wide by 8 cm long.  Choose paper with a bit of body - really lightweight stuff won't hold the folds as well or appear 3 dimensional when finished. I'm using some nice old sheet music.
Starting strip
Fold your rectangle in half lengthwise ( keep the prettier side out if your paper is only patterned on one side) to give you a folded strip 8cm by 2cm.
Fold in half
Fold in half crosswise so your piece is now 4cm by 2cm (like the one on the left). You then need to fold down the corners at each end of the strip.
Fold down corners
Hold your folded strip with the open edges to the top. Grab both layers of the top right hand side and fold them at 45 degrees to meet the bottom edge. Then do the same with the top left hand side.
You will be left with shapes like this. Each wreath takes 8 of them to complete.
Folded 8
Hold the first piece by the points. If you look carefully at the top edge, you'll see that there are two little pockets formed between the layers of paper. If you imagine they are numbered 1 2 3 and 4, you need to slide one folded point of the next piece, between layers 1 and 2 and the other between layers 3 and 4.
See the holes
I wish I could just show you, it'd be a lot easier! But try it, it's simpler than I am making it sound.
Insert second
Push the second piece down into the first until the tips touch the bottom of the pocket.
Push in
Then go on with the third piece in exactly the same way.
Add third
Continue round. The eighth and final piece gets the tips of the first piece tucked into its pocket to complete the circle.
Continue round
Fiddle with them to adjust so the wreath looks an even shape.All 8
I added a hanging loop by threading a bit of embroidery cotton through one of the tips using a needle.
You could go to town with fancy Christmas papers, upcycled glossy magazines, text from an old book - the origami wreath world is your oyster.  And if you have a go, do leave a link in the comments - I'd love to see them.
  
This is from a delightful blog, Domesticali.
Drop by and leave a comment telling her you found her here.
Reblog this post [with Zemanta]

Thursday, June 3, 2010

Here's another easy Christmas ornament to make ahead

Make a few of these ornaments and by the time the tree needs to be put up, you will have all you need to make it beautiful and festive.

Paper globe ornaments

I love these paper ornaments. They look so complex, but they really aren’t.

To start, you need 20 paper circles of whatever patterns you choose. I made mine about 1.5″. If you have a circle template or jumbo punch, it makes it really easy.
Fold the edges of each circle up in three places, so that it looks like a triangle with three tabs.
To make the top of the globe, take five of your circles. Glue the tabs together so that the five form a ring. Repeat this for the bottom of your globe.
To make the center of your globe, glue 10 of your circles in a line. The “triangles” will alternate pointing up and down, so that you have a straight band. Then glue the end circles together to make a ring. Glue the top and bottom pieces onto your ring.
I made a little paper dangle for mine. Once your done, just punch a few holes, put on a wire or ribbon hanger, and voila! All finished.
Enjoy!


These are from CraftTutorials

Wednesday, June 2, 2010

Easy, Breezy, Christmas tree ornaments!


Materials
- Two colors of letter sized paper
- Scissors, craft knife and ruler, or paper trimmer
- Glue (Tacky glue was perfect because it dries so fast)

There are two different ways to make this ornament.

Option 1 (ornament in the background)
  1. This is the simplest one. It only requires 4 strips of paper, of alternating colors. Cut each strip so that it is 11" (28cm) long (hint: cut along the long side of the letter-size paper) and 1/4" (6mm) wide.
  2. Fold over and crease 1/2" (13mm) of one end of one strip.
  3. Glue the new tab to the opposite end of the strip of paper. The teardrop will automatically form itself as you glue both ends together.
  4. Let it dry and repeat steps 1-3 three more times in alternating colors.
  5. Stack the teardrops together by tucking the creased ends one over the other. Tie them together with a strand of embroidery thread that is long enough to hang the ornament from. Done!


Option 2 (ornament in the foreground of the top photo)
  1. This style of teardrop requires 5 strips of paper in alternating colors. They will all be 1/4" (6mm) wide but will vary in length.
  2. The strips should be 11", 10", 9", 8" and 7" long.
  3. Follow steps 3 and 5 from above.
The simplicity of this project and the fact that the kids have been loving my paper trimmer recently, may help turn this into a group project. We'll shall see.

Here's a wonderful way to use what you have on hand to make some festive and easy decorations.  I found this on  A Little Hut where Patricia Zapata found herself in a hotel room with her kids and needed to make it more holiday-like and needed to entertain her kids at the same time.  Great post, great blog.  Check her out, won't you?  I'm off to make a few of these to use at work.
Reblog this post [with Zemanta]

Thursday, May 27, 2010

Here's another easy Christmas craft to make!

I know it is early in the year, but Christmas will arrive before you realize it and you will be frantically trying to enjoy the holiday while being stressed out with decorating, cooking, shopping, mailing, etc.  Why not start now to make a few lovely crafts to decorate your home this year and then maybe make some cards in the evening while watching television.  Before you know it, you will have the house festively dressed and your cards in the mail early!  All you will have to do then is shop and cook.  I might even have a few suggestions to make those two things quick and painless, too!

So, here is another fun Christmas craft for you and your family to make. Make a bunch and use these to hang on the tree.

Beaded Christmas Angel

The pictorials are illustrated with spaces between beads for a clearer direction, in the actual beading, there should be no spaces.

Beaded Angel Charm

What you need:
1)  Long Bugle Beads size 11/0 (half a centimeter long bugles - transparent or
     silver white color)
2)  Glass seed beads size 12/0 (silver white) OR 2 Heart shaped Swarovski crystals.
3)  One Swarovski Round spacer Rondelles (8mm).
4)  One 8mm round Swarovski crystal (white or beige), three 4mm transparent and
     eight 3mm transparent Swarovski crystal bicones.
5)  One long head pin and one white or transparent 3mm bead of any type.
6)  Beading string (0.25mm) and Round tip pliers.
Crystal Angel Tutorial
Step 1: The skirt for the angel:
Cut a piece of short string, around 6 inches long.

  • Add six size 12/0 white bead right at the middle of the string (marked by the red dot). Crisscross the other string through the last bead added (shown where both arrow exits) Making a beaded circle.
 
Step 2: Continue to:
  • Add one long bugle, one 3mm crystal bicone and one last long bugle on the bottom (red) string.
    Crisscross the other side of the string (black) through the last long bugle added.
    Continue to pass the red string (the one you used to add new beads on this step) through one old size 12.0 white bead from step 1 marked with A.
Step 3: Continue to:
  • Add one 3mm crystal bicone and one last long bugle on the right (black) string.
    Crisscross the other side of the string (red) through the last long bugle added.
    Continue to pass the black string (the one you used to add new beads on this step) through one old size 12.0 white bead from step 1 marked with A.
Step 4: Continue to:
  • Add one 3mm crystal bicone and one last long bugle on the top (red) string.
    Crisscross the other side of the string (black) through the last long bugle added.
    Continue to pass the red string (the one you used to add new beads on this step) through one old size 12.0 white bead from step 1 marked with A.
Step 5: Continue to:
  • Add one 3mm crystal bicone and one last long bugle on the top (black) string.
    Crisscross the other side of the string (red) through the last long bugle added.
    Continue to pass the black string (the one you used to add new beads on this step) through one old size 12.0 white bead from step 1 marked with A.
Step 6: Continue to:
  • Add one 3mm crystal bicone and one last long bugle on the left (red) string.
    Crisscross the other side of the string (black) through the last long bugle added.
    Continue to pass the red string (the one you used to add new beads on this step) through one old size 12.0 white bead from step 1 and one old long bugle from step 2 marked with A and B.
   
Step 7: Continue to:
  • Add one last 3mm crystal bicone and tie off, pass the excess string back through the piece so that the knot will not come off so easily.
  • Now you have finished the skirt for the angel.
   
Step 8: The middle wing section for the angel:
Cut a piece of short string, around 4 inches long.

  • Add one one heart shaped crystal, one 4mm crystal, two 3mm crystal, one 4mm crystal, one heart shaped crystal and one last 4mm crystal, tie off and pass the excess string back through the piece so that the knot will not come off so easily.
  • Options for the wings of the angel:
    Use two heart shaped crystal or make two heart shape with size 11/0 silver white glass seed bead (just like the one in my photo). Click here for the tutorial to make the heart shape with seed beads. But remember you only need to follow the first three steps on that tutorial as you do not need double layered heart shape.
Step 9: Putting the Christmas Crystal Angel Charm together!
  • Take one long eye pin, add one 3mm bead of any kind as long as it is white or transparent.
  • Add on the bottom skirt piece.
  • Add on the middle Angel wings piece.
  • Add on one 8mm beige or peach color Swarovski crystal.
  • Add on one Swarovski Round spacer Rondelle.
  • Cut away excess tip of the head pin, leaving only around 1cm for curling. Bent the excess 1cm head pin tip with pliers into a 90 degree angle bent.
  • Use a round tip pliers to curl the head pin tip into a closed loop.
  • Now you can add it to either your necklace chain, charm hook or even make one more and add earring hooks on to wear as earrings.
How to make a Crystal Angel
Here's the link to the original post where you will find even more fun Christmas Crafts!
Reblog this post [with Zemanta]