The Kindle comes with free wi-fi connection and the ability to access so many different types of reading material that it makes your head spin. This device will allow you to read books, magazines, newspapers, blogs, etc. with ease. This is a slim, lightweight device that is much easier to carry around in your bag. No more wasting time waiting at the doctor's office or in line at the store. Now you can be connected and be reading no matter where you go.
Here are just a few articles in the news about this topic:
E-reader Price War --Wednesday, June 23, 2010
On the Business Beat, our focus is on the electronic reader and a new layaway plan.
The electronic reader war continues heating up today.
Bottom line, the prices are coming down.
Target is now selling the Amazon Kindle, with the price down to $189. The price drop follows Barnes & Noble cutting the price on its "Nook" to $149, and its 3G model to $199.
Also out there, the Borders version, called the KOBO, selling for $149 [...read more...]
Amazon Kindle sees price drop -- June 21st, 2010
Amazon just announced that their Kindle e-reader will receive a price drop to $189, falling all the way from $259. It would be interesting to see just how this rather steep price drop will help boost the Kindle’s sales in wake of the iPad’s phenomenal release and sales performance figures thus far. For those who have been living under a rock for the past few years, the Amazon Kindle is the 3G wireless portable reader which allows you to think of a book and be reading in 60 seconds, regardless of where you are – subject to availability of a Wi-Fi or 3G connection, of course. Best of all is, there are no monthly fees or annual contracts to worry about, and you can choose from more than 600,000 books. Woe to those who purchased the Kindle just a day earlier at the full $259 price, eh? Press Release
Bought a Kindle Too Soon? Ask For a Refund -- June 22, 2010, 4:43 PM ET
Some people who were on the fence about buying a dedicated e-reader may be celebrating Monday’s price war between Barnes & Noble’s Nook and Amazon’s Kindle. For the first time, both devices now cost less than $200.
- Associated Press
- Amazon’s Kindle

Now some good news: Both companies say they’re willing to refund customers who bought their e-reading devices recently. You just have to ask for it.
Amazon says it will give the $70 price difference between an old and new Kindle as a credit to customers whose devices were shipped in the last 30 days.
Barnes & Noble says it will give customers a $10 refund and $50 gift card to Nook customers who are still within their 14-day return policy period. You can contact customer service, or just find the store manager at your local Barnes & Noble branch.
Follow Geoffrey Fowler on Twitter.
For information on Kindle visit The Kindle Reader.


 STEP 1 : DOWNLOAD TEMPLATE. This is how the template looks. I've not included the patterns, you may want to decorate them as you like. Digitally or with sharpies/colour markers. I've used quilting textile patterns and put in the recipients name with Adobe Illustrator. If you need the illustrator file, just e-mail me.
 STEP 2 : DESIGN YOUR ORNAMENT & PRINT. That's my work table with all the printed shrinkable plastics. Choose shrinkable plastics that allow you to print on your inkjet printer if you intend to do this digitally. Read instructions on shrinking percentage and enlarged as you seem fit. Bigger ornaments need bigger graphics (you may try out one first.) Usually shrinkable plastics will shrink about 50% tp 60% from the printed size. Some may even shrink horizontally more than vertical. For mine, the rounded ornaments started as perfect circles, but when they're heated it shrunk vertically more, so they now appear oval like.
 STEP 3 : Remember to print at 50% lighter shade. Because of the shrinking that will take place in your ovennete, things will appear very much darker.
 STEP 4 : CUTTING OUT THE PIECES. All arranged out. I'd advice you to cut 1 set at a time and punch the holes as soon as you do. Make sure the punches are on the same direction for all the pieces. If not, you will have the holes in the wrong edges.
  Step 5 : PUNCHING THE PIECES. Only punch the edges where you will sew the pieces together. Always remember to punch before heating, if not it will be too late to punch once it is shrunk! Too thick and too damn hard! Oh yes, a bigger punch is used if you need a bigger hole. Too small of a hole will not be effective once it is shrunk. (I hope that makes sense.)
 Step 6 : HEATING THE OVEN. Please use the oven. NO MICROWAVE OVENS (unless you want a Chernobyl incident here!) I use a simple toaster oven. You need very low heat (follow manufacturer's heating instructions). Pop them two at a time on top of foil. Watch them shrink and curl. Don't worry about the curling, it will naturally uncurl once it is ready to come out. This will take less than 30 seconds or more depending on heat. When there is no more movement or shrinking, pick them out with wooden chopsticks onto a wooden board and flatten while still warm.
  STEP 7 : Place on wooden board to cool. Do the rest. It's quite automatic after awhile. If you notice unsightly dents in the middle, it means that your piece needs more heating. Do not overheat though, it will take a lot of heat to melt it again and it will be disastrous.
 You can pop in The big pieces on at a time. Don't be in a rush, I know you'll get excited watching it shrink and dance but you need to control the curving when it comes out from the oven and you need to flatten it immediately.
 Check out the shrinking.
 Laid out to rest.
 STEP 8 : VARNISHING. I used Modge podge to varnish and waterproof the pieces. You can also use aerosol sprays but Modge Podge is way cheaper. Let dry overnight and away from busybody 4 year olds.
 STEP 9 : ATTACHING THE PIECES. Select matching buttons. Size of buttons depends on how far the holes are from one piece to another ornament piece. I tie a knot to secure the button first before sewing onto the pieces.
 Select the last piece and sew to the upper one.
 To knot off by going around a few times and knotting at the back to properly secure the button to the piece.
 Sewing the upper pieces together depending on how many layers you want your ornament to be.
 STEP 10 : ATTACHING THE RIBBON. Assemble the ribbon and buttons for the upper ornament.
 STEP 11 : ATTACHING THE RIBBON FOR THE TOP MOST ORNAMENT. With the same method, attach the topmost ornament with a ribbon for hanging. Select soft ribbons for this.
 Do the bow for the middle. You can opt for felt cutouts or maybe lace, there are many possibilities. Use your noodles!
 Step 12 : ATTACH THE RIBBON to THE MIDDLE.
 Knot off with the same method for a neat finish.
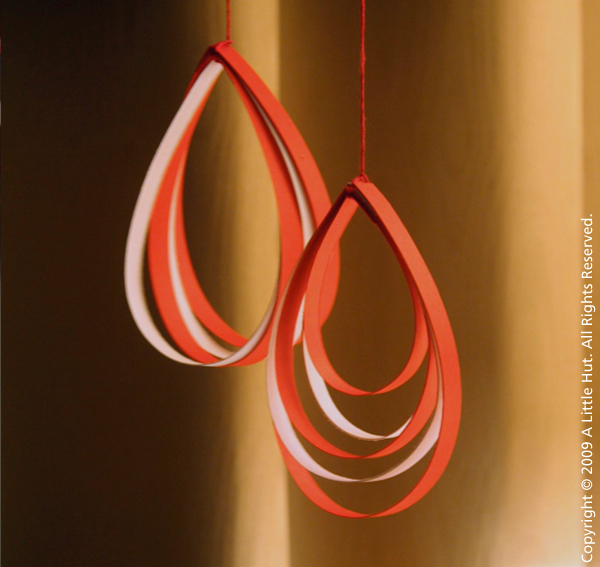
 Tada! The finished ornament. This is for Melissa of Group 17.
 All in a row. I even made one for myself. Now, remember to write to me about your creation this Christmas.


![Reblog this post [with Zemanta]](https://lh3.googleusercontent.com/blogger_img_proxy/AEn0k_uoviBA6t4hx5HyJDXDj8_rEGLC0Qxqn19VZjuDviP8lsz7yf_WhM7qNLQNX0UYy7PYi9Ao7sNkDQbUkDKhL5-2xs3ykIvu52hYLtj8ij_wmoO_maZoUpVumiTu8qVyZYGpZrNguLOiV9x5nUDtgZEp=s0-d)


![Reblog this post [with Zemanta]](https://lh3.googleusercontent.com/blogger_img_proxy/AEn0k_tL69xvQjmv-wXNSTpAm3IM9ubzjosYUUCG_lKE9JrOMSM5WySWQTRseLTFKdsQjA6Gmh6ioUIT3C39ADQb6rF1ZIlafW4qqSEq3cUc1SKHbSAzb9EIvEj41pyShChGdQzmJCK2wfaJ698LbAtPwac=s0-d)


![Reblog this post [with Zemanta]](https://lh3.googleusercontent.com/blogger_img_proxy/AEn0k_ucvc3ohePcauZPOfPK2ueE4wITdYV6KJ3DI1aScCIWtY_qaOWo3L3H_6x6XdtRNtrdV08gT5IPXazCboRTyM_G1dsqIm-XW_Ql76NJP-SrA4nQ7G508vykzdFGozVUyogQqNYrFj50A7dY5_AySe_C=s0-d)